Pine Needles at Gardner Village
1100 W 7800 S #3
West Jordan UT 84088
801-233-0551

contactus@pineneedlesonline.com

Tuesday, August 28, 2012

LABOR DAY SIDEWALK SALE

During the Labor Day Sidewalk Sale, Pine Needles' porch will be overflowing with clearance fabrics, patterns, books, and more!
  • Over 100 bolts of clearance fabrics as low as $3 per yard. Plus, finish the bolt and save an additional $1 per yard.
  • Select embroidery, quilting & cross-stitch patterns up to 75% off.
  • Select quilting books up to 75% off.
  • Select quilt kits 50% to 65% off.
  • Plus a selection of models for sale (that rarely happens)!
These are savings you do not want to miss! Come in early for the best selection, at these prices they won't last long!

Wednesday, August 22, 2012

What's New Wednesday!

Wow!  The ladies at Pine Needles have been busy!  We have FIVE new baby quilts to show you that are on display in the shop, and yes we do have kits for each of them.

Ravishing Ruffles by Sew Cute Quilts
made with the fabric line Fresh Cut by Heather Bailey

New Arrival by Two Peas in a Pod
made with Linda's selection of fabrics

You Are My Sunshine by Cute Quilt Patterns
made with Cecilia's selection of fabrics

First Steps by Me & My Sister
made with the fabric line Savannah Bop by Andover Fabrics

Pick Me by Cute Quilt Patterns
made with the fabric line Seaside by Riley Blake


Today I only showed you the new baby quilts on display in the shop, BUT there are plenty of new full size quilts on display in the shop as well!

See you soon!

Monday, August 20, 2012

Make it Monday


It's back to school time! Here's an idea for something extra special to send off with your little monster on their first day. Having something this cute and handmade will remind them at school how much they are loved. Super soft minky makes the perfect monster fur, and the shop is full of so much adorable minky right now! I brought my 3rd grader with me into the shop to pick out her favorite color. I think this fuzzy pink she picked is perfect!

For your supplies you'll need a third of a yard of minky fabric, a fat quarter for the lining, a colored zipper for the mouth (the shop also has lots of fun bright colored zippers to choose from!) 2 button eyes and some scraps of felt.


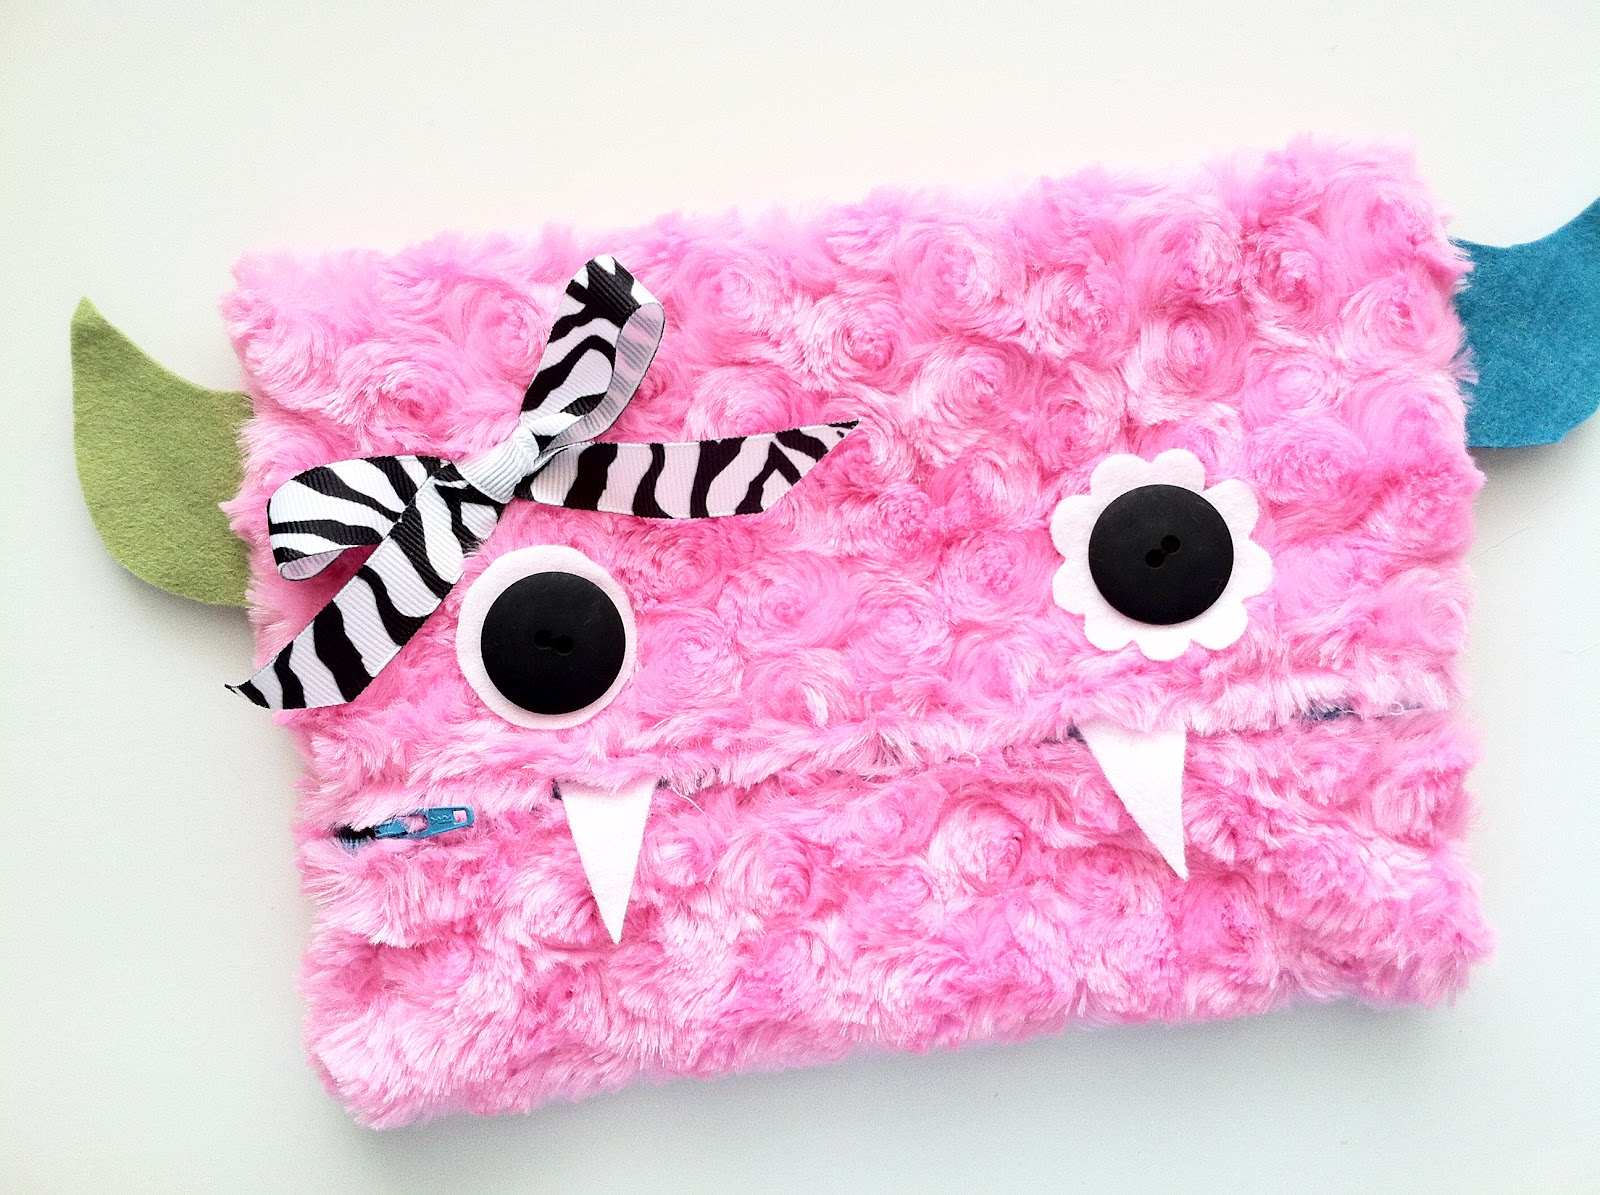
Before I began, I used the scraps of felt to make some eyes, teeth and horns for my monster. I drew these little pieces free-hand.


Next, trim your fabric to 10 x 14 inches. You'll need one 10 x 14 inch piece from the minky and one 10 x 14 inch piece from the lining fabric.


Iron the 10 inch sides of both fabrics in 1/2 inch, like you see I've done below. Minky can be a little tricky to work with and iron. I placed a separate piece of cotton on top of the minky while I ironed it to keep it from melting. It also doesn't like to hold a crease, so a bit of starch might help.


To sew on your zipper I used a very simple method. I didn't want to have to cut my minky any more than I needed to (the stuff can get pretty messy!) so I kept it to just one piece. In order to sew your zipper in this way you'll have to top stitch it in place. Lay your two pieces of fabric WRONG sides together and slip your zipper in between the two fabrics (on the 10inch side, where you just ironed your 1/2 inch seam). Make sure that the pull of your zipper is facing the minky side, or the outside. Pin your zipper in place. See picture below for help.


Next top stitch your zipper in between your two fabrics, like I've done below...


You'll now bring the other side around (so it forms a tube) and do the same thing, pinning it to the other side of the zipper. It helps if you unzip the zipper!


At this point I added my little monster's features.


Position your zipper so it is about in the middle of the face, I did mine a little lower, where a mouth would be.


Get creative with the features. You could have one big eye and one little or maybe even 3 eyes!

Turn your monster inside out and unzip your zipper about half way...


Sew the sides closed...
(as your are sewing up the sides you can add some horns if you like. Just slip them into the seam and sew straight across)


You can sew straight across your zipper. Just make sure that the end of the zipper that is open meets up together. Trim off the excess zipper.


Now turn your little monster right side out through the open zipper.


Don't forget, once she's done she'll be hungry for some brand new school supplies!


Here's to a great new school year! You can check out a picture of my daughter with her brand new Minky Monster Pencil Case on my blog at mycottoncreations.blogspot.com


Saturday, August 18, 2012

A Try at Paper Piecing

I have taken a few mini classes on the basics of paper piecing, but I have never really completed a project using the technique.  Until now....


Using the pattern Pumpkin Patch Quilt & Pillow, by Kimberbell Designs, I made a pillow with these fun bright orange and black fabrics, with just a hint of green.  When I saw the black fabric I used on the outer border,  I knew it wanted to be a part of this pillow.  And I love how it turned out!  It makes me want to scream, "HAPPY HALLOWEEN!"


So not bad for a first try at paper piecing, don't you think?  We have the patterns and kits for this project in the store now :)


Wednesday, August 15, 2012

WHAT'S NEW WEDNESDAY

This week we have some great things to show you that are new in the shop.

First, a new quilt that Linda made for the shop.  Giggles & Squeek by Such Designs.  Don't you just L-O-V-E love these crazy animals?!?


Here's a picture from market that used the same quilt pattern, but they had just made one block into a pillow. I think I may even love the pillow more than the quilt, and that is saying A LOT  because I LOVE the quilt!


Several weeks ago we received our shipment of Dr. Seuss Cuddle fabric.  Julie took some of the pieces and made a darling quilt. 


I love that she mixed it up with different sizes of strips.

And last but not least, Cecilia made a darling version of the Kids Cuddle Strip Quilt using some of the Dr. Seuss Cuddle fabrics that Julie did not use in hers.


I love what the contrasting black solid, and the black & white striped Cuddle fabrics do for the quilt.

I hope you enjoyed seeing a few of the new items we have in the shop this week.  See you soon!

Thursday, August 9, 2012

PINE NEEDLES
in Gardner Village
Moonlight Madness Beach Party

Saturday, August 11th
from 6pm to midnight
beachparty


A-lo-ha! Yank out your Hawaiian t-shirts
and leis, it's time to surf over to the
Midnight Madness Beach Party
at Gardner Village.
Relish in the spirit of the islands through
music, island dance shows at 6:30, 7:30 and
8:30 and a delicious barbecue.
Shops will be hosting activities so you can
win prizes and receive incredible discounts
all evening during this huge savings event.
The party goes from 6 pm to midnight!
Come and party with us!
Your Friends at
Pine Needles

Wednesday, August 8, 2012

What's New Wednesday!

If you are a follower of Pine Needles' Facebook page, you may already know what's new in the store this week.  But for those of you who are not followers, let me show you this weeks' What's New Wednesday.  It is an incredible sight....


Riley Blake now has chevrons in THREE SIZES and MORE COLORS!  Now is the perfect time to embrace the chevron trend, and with all of the chevrons in one area for your viewing pleasure, the choice will be will be a delightful one!  Of course now you will have to decide how much to buy of each one, eek that will be a difficult decision!


See you soon!!!

Sunday, August 5, 2012

MAKE IT MONDAY - Yo Yo Bracelet tutorial

I am excited to be back with you for Make It Monday!  It's been a while since I have shared a tutorial with you, but this one is a goodie!  My sister Sherie made the most fabulous bracelets for all of us last Christmas and I am excited to share how she did it with you!  

Here is a quick video of the finished product.


Supply List:
  • 1 metal cuff
  • Fabric scraps
  • 20mm Clover yo yo maker
  • 30mm Clover yo yo maker
  • Needle & thread
  • Fabric Tack glue or hot glue gun
  • decorate buttons and/or beads


  1. Measure width of metal cuff and add 1/2" (image 1)
  2. Measure length of metal cuff and add 1/2" (image 2)
  3. Cut fabric for covering metal cuff to equal this measurement. (image 3)
  4. Fold in half, right sides together and sew along long edge using a scant 1/4" seam allowance. Open so that the seam is down the center and sew one end closed. (image 4).  
  5. Turn right side out and thread onto metal cuff (image 5)
  6. Fold open end of fabric in around metal cuff and hand stitch closed (image 6 & 7)
  7. Using your 20mm and 30mm Clover yo yo makers create an assortment of yo yo's.  I used (5) 30mm and (2) 20mm yo yo's. Glue along bracelet working from the center and out either side. 
  8. Embellish.  I added 2 buttons and then glued a pearl bead in the center of one of my yo yo's. 
Of course, the metal cuff that I used is available at Pine Needles as well as the Yo Yo makers.  If you haven't used these fabulous goodies you must give it a try - what a snap!

Here's a link to Pat Sloan's video on how to use them.

Wednesday, August 1, 2012

What's New Wednesday!

Home is Where the Haunt Is


It's never to early to start getting ready for what is most womens' favorite holiday (I've often wondered if it is because Halloween is the first holiday following the kids' return to school)!!  This week we have had SO MANY Halloween models come into the store, that I wanted to share a few that are NEW TO PINE NEEDLES.....

These are 3 FANTASTIC HALLOWEEN patterns from the talented Kim Christopherson of  Kimberbell Designs.  There is a quilt for the adventurous, a table runner for the enthusiast and a pillow for the novice OR all three for the FANATIC!


Not So Spooky

Too Fa-BOO-lous!

All three patterns are in stock, along with a GREAT selection of Halloween fabrics and kits to help make the selection process easier!  See you soon!